I love pickles! My favorite foods are probably bread, cheese, pickles & olives, and guacamole. I could never leave any of those unfinished on the table.
Lately there has been a lot of pickling going on in the food blogger world. I sent a few recipes over to my friend
Renee and we decided to join in the fun. She went first – trying out the bread and butter pickle recipe from
She’s Becoming Doughmesstic. Renee put her own twist in – adding in some garlic and a few extra spices. We tasted and decided that they needed more vinegar and less sugar for our taste. I tried next – swapping the quantities of vinegar and sugar and differing the amounts of scallions and cilantro. I also used ground mustard instead of mustard seeds. We tasted again and agreed that the less sweet pickles were more to our liking.
Next up, Renee tried a more traditional dill pickle recipe with a recipe from Rachel at
Loco Diner. These were good – but needed more time to cure. We couldn’t put our finger on what was missing, but they needed a little something else. Maybe salt? Maybe more vinegar and less water? More spice? She’s working on that for the next batch.
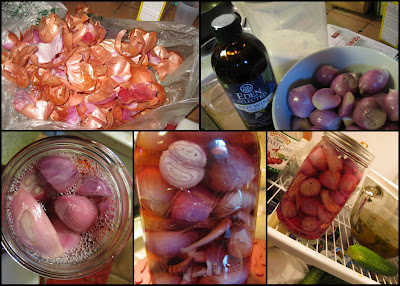
Now that we had basic pickling down, we decided that pickled onions were next. But instead of red onions I picked up 2 pounds of shallots. Aren’t mini-sized foods always cuter? (I know Meghan at
Delicious Dishings would agree!). I adapted a recipe from Ad Hoc at Home and pickled a lot of shallots.
Once I had a selection of each of the pickled items, I set up a pickle tasting for the hubby. I felt like we needed an official tasting for research purposes.
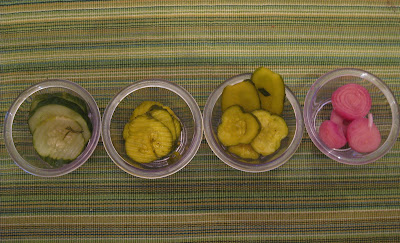
In the pickle line-up:
First on the left: Renee’s traditional dill pickles
To the right: Renee’s crinkle cut spicy bread and butter pickles
Next: My chip and sandwich slice bread and butter pickles
On the right: Pickled shallots
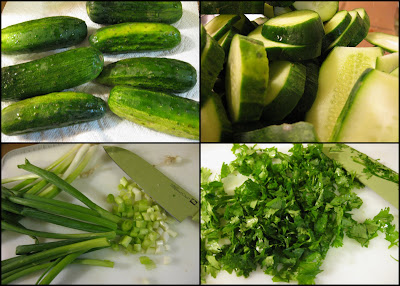
For my pickles I used pickling cukes that I picked up at
Charlton Orchards Farm and Winery at the Russell’s summer market. I decided to make a mix of chips and sandwich slices. I think that all the pickles were a success! The bread and butters were tangy and crunchy. The shallots were great as additions to brisket and chicken sandwiches.
Now every day at work Renee and I talk about what else we can go home to pickle. Next on my pickle to do list is half sours. Half sours are my absolute favorite pickle. Do you have a recipe? Send it my way! Next on Renee’s pickle to do list is beet pickled onions. They are in the refrigerator pickling while I write this!
What’s your favorite type of pickle? Dill, half sour, gherkin, bread and butter?
Quick Bread and Butter Pickles
Adapted from recipe on She’s Becoming Doughmesstic
6-7 Pickling cucumbers, washed and sliced into 1/4 inch chips and slices
1/2 cup chopped cilantro
1/2 cup chopped scallions, whites and greens
2 cups white vinegar
1 cup sugar
2 tablespoons kosher salt
1 tablespoon celery seeds
1 tablespoon ground mustard
1 tablespoon ground turmeric
I didn’t have any canning jars, so I used a large glass batter bowl (oven/heat safe) with a lid
Mix the cucumbers, cilantro and scallions together in the bowl (or jar if you have one)
Set aside on a trivet (you’ll be adding in hot liquid)
Assemble the vinegar, sugar, salt, celery seeds, ground mustard, and turmeric into a medium sauce pan and whisk together
Bring the mixture to a boil and let boil for 2 minutes to dissolve sugar
Remove from heat and carefully pour/ladle the liquid into the bowl with the cucumbers, cilantro, and scallions
Make sure to use black or stainless steel – this is a very yellow and staining mixture!
Let the mixture cool for about a half an hour and then put on the lid
Put in the refrigerator and let cure for 24 hours
After 24 hours I strained the liquid to remove the solids (cilantro, onions, etc)
I stored the pickles in the strained liquid
These lasted only a few days in our house – so I can’t tell you how long they will stay in the fridge
Pickled Shallots
Adapted from recipe for pickled red onions in Ad Hoc at Home
2 lbs of shallots
1.5 cups Red wine vinegar
3/4 cup granulated sugar
Wide mouth quart jar with lid (I used Ball brand)
Peel shallots
Slice a few of the shallots into smaller pieces (this will help to pack the jar tightly)
Fill a clean, warm canning jar with the shallots
In a medium saucepan, mix the sugar and red wine vinegar
Bring to a boil and let boil until sugar is dissolved, about 3 minutes
Carefully ladle or pour the hot liquid into the jar with the shallots
Let cool for 20 minutes and then put on the lid
Put the shallots in the refrigerator and let them cure for about 24 hours
Serve with everything (well, maybe not breakfast….)
Summary:
Prep time: About 15-20 minutes of chopping
Cook time: 3-5 minutes boiling
Inactive Cook time: 6-24 hours (depending on how long you can resist trying the pickles)
Glass bowl or jars, sauce pans, ladles, cutting board and knife
Serving Suggestion:
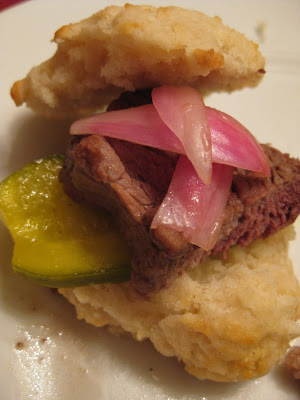
Smoked brisket sandwich with pickles & shallots on a homemade biscuit!
(Keep an eye out for my brisket recipe on www.LocalinSeason.com!)