Monday, December 21, 2009
Snow Outside, Hearty Pot Roast and Biscuits Inside
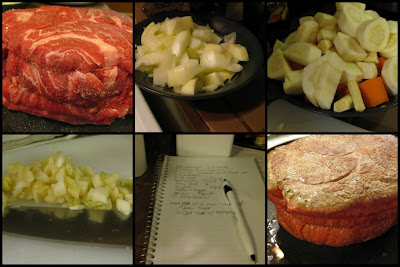
In the spirit of holiday creativity, I made up my own pot roast recipe. I checked an old Cooking Light slow-cooked pot roast recipe for cooking tips and then opened the fridge to pull out the ingredients. For the roasting liquid, I had a bottle of unused Castle Rock Pinot Noir (no red drinkers at my Thanksgiving feast). We had enough for dinner, and two lunches each (6-8 servings, depending on how hungry you are).
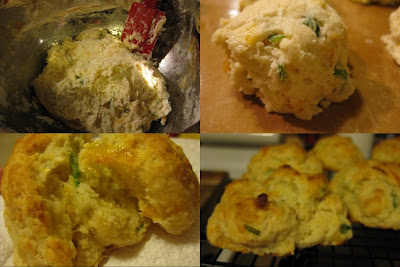
For the side dishes, I cooked up three options. First, cheddar-scallion biscuits. Second, traditional potato and onion latkes. Third, sweet potato and scallion latkes. All delicious, and all great with the pot roast! I'll write up the latkes tomorrow. For this post I'll focus on the pot roast and biscuits.
The biscuits were inspired by a post at Playing House but made following a recipe from TracyFood. The biscuits were unbelievable. Buttery, flaky, cheesy, scallion-y, mmm.... The only change I would make next time is to add a little less salt. For my biscuits I used a cheddar-jack cheese mix. Visit TracyFood for the full recipe! Now on the meat...
Snowy Weekend Pot Roast
1 3-ish lb. beef chuck boneless eye round, tied together
2 medium yellow onions, chopped
1 lb. parsnips, peeled and cut into 1 inch pieces
1 lb. carrots, peeled and cut into 1 inch pieces
2-3 russet potatoes, peeled and cut into 1 inch pieces
1 cup Pinot Noir (or other red wine)
1 cup reduced sodium beef broth
2 bay Turkish leafs
Kosher salt and pepper (I forgot to measure)
3 cloves of garlic, chopped
1 tablespoon olive oil
1-1.5 teaspoons dried thyme
1 teaspoon sage
Set up your slow-cooker
Heat the oil over medium-high heat in a medium sauce pan (big enough to pour in your liquid and veggies)
Rub salt and pepper on all sides of the roast
Sear meat in pan, approximately 2 minutes per side
Remove meat from the pan and put into the slow cooker
Add a little more oil to the pan, and then add in onions
Cook for about 8 minutes, until they are just beginning to brown
Add in garlic and cook for 1 minute
Pour in wine and beef broth, scraping up any bits on the bottom of the pan
Stir in sage and thyme
Carefully pour the liquid over the roast in the slow cooker
Put the carrots, parsnips and potatoes around the meat
Put in the two bay leafs and sprinkle with a little more salt and pepper
Cover and cook on high for 2 hours
Reduce heat to low and cook for an additional 3-4 hours, until tender
The biscuits on the side were fabulous! I'll let you check out TracyFood for the recipe, but will share my mouth-watering photos below.
Sunday, December 20, 2009
Happy Chanukah!
There are a few readers out there who are interested in reading about my experiment with making a modified Chanukah food. Instead of traditional fried sufganiyot (jelly donuts) - I found a recipe for sugar donut muffins that I turned into jelly donut muffins!
I used a basic buttermilk muffin recipe from my well-worn copy of Joy of Cooking along with some techniques from a recipe on Baking Bites . The idea to inject jelly in the center was all mine. One of my pet peeves is that all the commercial jelly donuts are filled with raspberry jelly, my second least favorite fruit (peaches are #1). I wanted these to be just the way I like them! To get strawberry preserves into the middle, I used a pastry decorating bag with a long narrow tube on the end.
Tomorrow at work is our holiday potluck happy hour, so I doubled the recipe to make enough to share. I averted a small disaster, after mixing all the ingredients in the first batch and pouring in to the muffin tin, I saw the sugar still sitting on the counter. Oops! So all the batter came out of the pan, the sugar was mixed in, and then the muffin tins were filled again. I made a mix of mini-muffins and regular muffins. A warning, these are buttery, sugary, delicious and not at all healthy. But if you figure they are a once or twice a year indulgence, who cares! Enjoy!
The sequence is: 1) Bake the muffins, 2) Coat in butter and sugar, 3) Fill with fruit preserves, 4) Try to refrain from eating them all yourself.
Jelly Donut Muffins
Adapted from Joy of Cooking's Basic Muffins Recipe
This will yield 12 regular muffins or 24 mini-muffins
Dry Ingredients
2 cups all-purpose flour
1 tablespoons baking powder
1/2 teaspoon baking soda
1/2 teaspoon salt
1/4 teaspoon ground nutmeg
Wet Ingredients
2 large eggs
1 cup of low-fat buttermilk
2/3 cup sugar (don't forget!)
6 tablespoons warm, melted unsalted butter
1 teaspoon vanilla
Preheat the oven to 400 degrees
Set up a wire cooling rack for the muffins when they are done
Grease either standard 12-muffin tin or 24-mini-muffin tin
Mix the dry ingredients together in a large mixing bowl, set aside
Whisk together the wet ingredients in a bowl
Add the wet ingredients into the large mixing bowl (dry ingredients) and mix until just moistened (be careful not to over mix - the batter won't be smooth)
Using a greased tablespoon, scoop the batter evenly into the greased muffin tin
Bake until a toothpick stuck in the center of the muffins comes out clean, about 12-15 minutes
For the sugar donut part:
1 stick of warm melted, unsalted butter in a shallow bowl
1/2 - 1 cup of sugar in a shallow bowl
When the donuts are done baking, remove from the muffin tins and set on the wire rack
Brush the top of the muffins with the melted butter
Roll the muffins in the sugar and then place on the cooling rack
Repeat until all the muffins are coated in sugar
For the Jelly Filling
1/2 - 1 cup of strawberry preserves
Fill the pastry bag with the strawberry preserves and push it down to the tube
Stick the tube in the top of the muffin and squeeze for about 2 seconds, pulling the tube out as you squeeze
Be careful not to overfill the muffins (they will break apart)
Enjoy warm or at room temperature. And be sure to have a large glass of milk to wash them down! This will be on my holiday recipe list every year now.
Sunday, November 8, 2009
Local Squash - Tasty Pie
I haven't been baking as much as I used to, since I've been busy doing homework after dinner is over. My usual baked goods are quickbreads (banana, zucchini), cookies, and a few tasty apple cakes. I can't remember any time that I made my own pie crust from scratch. So this was an adventure! Next time I'll need to be a little more precise in my measuring techniques - it all worked out fine - but could look prettier. It tasted great!
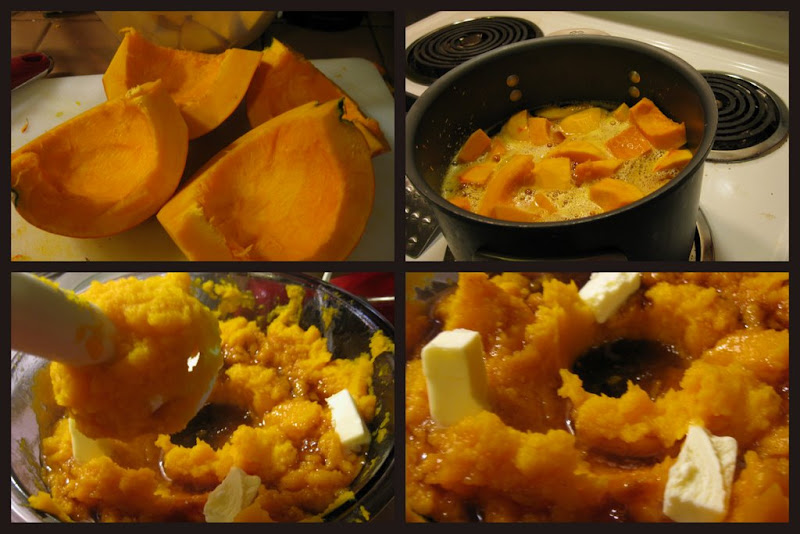
Back in October, I made a maple kabocha squash puree that I thought would be great as a pie filling. At the farmer's market, I picked up some red kuri squash at the Atlas Farms booth. I don't like overly sweet desserts, so this filling might be a little savory for those of you with a severe sweet tooth. I also didn't make a traditional custard-like squash pie filling (like a pumpkin pie). Next time I'll add in an egg and some liquid so that the filling stays together a little more. I forgot to write down the measurements for the spices - adjust as you see fit! If your local farmers don't have red kuri squash you could also use kabocha, butternut, or the smaller pumpkins.
Maple Red Kuri Squash Filling
2 small red kuri squash, peeled, seeded and cut into 1-inch cubes
1 tbsp. kosher salt
Water for cooking
1/3 cup (appx.) maple syrup
3-4 tablespoons of unsalted butter
1 tablespoon vanilla extract
1 teaspoon cinnamon
1/2 teaspoon (a little less) nutmeg
A dash of ground cloves
Place squash cubes in a medium-large stockpot
Add about two inches of water (the squash won't be covered)
Sprinkle the salt across the top
Bring to a boil and immediately reduce heat to low
Simmer for about 10-15 minutes, until squash is fork tender
Drain and place squash into a mixing bowl
Puree with an immersion blender until smooth
Mix in butter, maple syrup, and the spices
Chill until ready to bake the pie
Delicious Flaky Pie Crust
I won't re-type this pie crust recipe, I'll point you to the blogs where I read about this great recipe. You can visit Delicious Dishings or Playing House for the link to the recipe. I will say that the secret to this flaky crust is chilled ingredients - especially the ice cold vodka. I used what I had in the freezer - guess I should call this Absolut Squash pie. You can't taste anything but the flaky deliciousness after baking. There is a reason that people go to culinary school to learn how to make pastries! I had a blast making this, but I definitely do not have the pastry patience!
A few notes on my pie crust preparation. First, after all this cooking I still don't have a large food processor. This means that I either process in small batches or I turn to my immersion blender. For this recipe, I'm sure that my immersion blender method affected my dough mixing success. It still came out great, but it was a little unwieldy to work with.
Second, I have a great rolling pin but nowhere to roll out the dough. I improvised and taped down a huge sheet of wax paper to my countertop. Next time - a silicone mat! Thankfully I had two balls of dough to work with (the recipe is for a double crust pie). The first didn't roll out very nicely, so I turned it into lattice strips for the top. The pastry gods were looking out for me - the second ball of dough rolled out much nicer.
Tuesday, September 15, 2009
Apple Kugel Muffins - Happy New Year!
I was rushing through the recipe and accidentally confused tablespoons with teaspoons. That meant that I added in a little too much cinnamon (can't be too bad). I would have added too much almond extract, but there wasn't enough left in the bottle.
Make sure to heavily grease your muffin tin (or use muffin tin liners) - these have a tendency to stick a little.
Here's a nice view of the inside. The apples get soft and spread out into every bite. I give these 2 days before we eat them all!
Pictures of Apple Kugel Muffins tonight!
They told me that the apples are good for baking - so I'm going to whip up a batch of apple kugel muffins tonight after dinner! Stay tuned!
Wednesday, September 9, 2009
Almost time for the Holidays! Apple Kugel Muffins
Apple Kugel Muffins (or Cake)
Adapted from Kosher by Design
3 eggs
1/2 cup vegetable oil
1 cup sugar
1 teaspoon cinnamon, plus extra for sprinkling on the top
1 teaspoon almond extract
1 cup flour
1/2 teaspoon baking powder
2-3 apples, peeled, cored, and diced into small pieces (I have used golden delicious, McIntosh, granny smith, and other local baking apples)
Preheat the oven to 350 degrees
Grease 12 muffin regular muffin tins or springform pan
In a large bowl, mix together all the ingredients except the apples
Using a mixer (or hand mixer), beat at medium speed until just smooth (don't over mix it)
Place a small amount of apples in each muffin tin (or cover the bottom of the springform with the apples)
Spoon the batter evenly into each tin to cover the apples (pour batter evenly over the springform)
Sprinkle with extra cinnamon
Bake 20-30 minutes for muffins (30-40 for the springform)
At the low end of the time, check for doneness
Enjoy!
Wednesday, August 19, 2009
Guest Post by Jim (our fab photographer)
When our friends Jim and Chris came over for dinner last month for the Good Cook Doris photo shoot, I made a quick apple-cinnamon pull apart bread with biscuits. Jim put his own spin on it with fresh peaches and cinnamon rolls. Looks delicious!
Make sure to check out Jim's photography too!
Monday, August 17, 2009
Summer Zucchini with a story
The real story here is that my hubby and our friends Aaron and Amanda used to live in the same house that my coworker now lives in. Amanda built and planted a nice veggie garden out back so she could eat sustainably. So in fact, this zucchini came by way of Amanda (just 6+ years later). Thanks Amanda!
I wanted to make zucchini bread, but a quick scan of the fridge didn't show too many ingredients. I googled a recipe for zucchini bread + 1 egg (the ceaseless wonders of search engines) and went with the first recipe that popped up - Lemon Zucchini Bread. One thing I've learned is to check out the reviews with recipes. I followed the tip to add in some vanilla to the batter. It turned out great and we ate it all!
After the bread, I still had another zucchini left. We were getting to head out of town for wedding #3 of the season and wanted to use it up before we went. I cut it up and pondered something quick and easy to make. With the hot summer temperatures I wanted something that didn't completely heat up the house.
I sauteed the zucchini with some olive oil and salt and added it to some tri-color rotini. In the spirit of grow-your-own food, I added some fresh basil from our plant and kept it simple with olive oil and lemon juice. The hubby topped his with grated Parmesan and proceeded to clean his bowl - the sign of a tasty dinner.
Monday, April 6, 2009
Strawberry Bread
 The picture does not do this Strawberry Bread justice. I have no idea where I got this recipe, it is in my stack of printed recipes with no title and no source. I found it last summer when we went strawberry picking and needed a lot of creative ways to use up what we picked. It's a quick bread - mix and bake for 1 hour and enjoy! The recipe calls for frozen strawberries, but I just used a few extra fresh ones and added a dash of orange juice for a little extra moisture. Enjoy!
Strawberry Bread
1.5 cups flour
1/2 teaspoon salt
1/2 teaspoon baking soda
1.5 teaspoons cinnamon
1 cup sugar
10 ounce package or 1 and 1/4 cups frozen strawberries, thawed
2 eggs, well beaten
1/2 cup nuts chopped (optional)
1/2 cup cooking oil
Preheat oven to 350 degrees
Grease and flour a loaf pan
Sift dry ingredients together in a bowl
In a separate bowl, mix all liquid ingredients (including strawberries and a dash of orange juice)
Add liquid mixture to dry ingredients, stirring only enough to mix
Do not over mix - batter will be lumpy
Pour into loaf pan
Bake for 1 hour
Cool for 10 minutes and remove from pan
Note: if you use fresh strawberries, cut off the stems and slice them into quarters
Summary:
Prep time: 10 minutes
Cook time: 1 hour
2 bowls, spatula, loaf pan


