Showing posts with label beef. Show all posts

Monday, December 21, 2009

Snow Outside, Hearty Pot Roast and Biscuits Inside

With temperatures in the twenties and the snow ready to fly, it was the perfect weekend for comfort food. I've been making a lot of brisket and short-ribs over the past year and wanted to try something different. I fought off a few crazy women at the grocery store and brought home a nice beef chuck boneless eye round. Out came the slow-cooker, the meat could roast while I got to work on some cheddar-scallion biscuits and latkes.

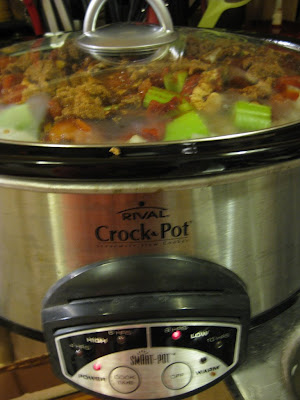
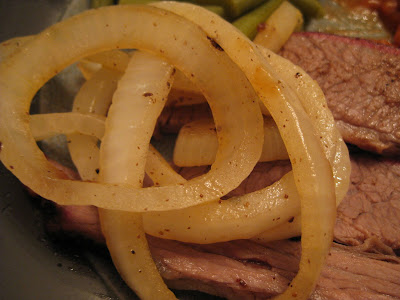
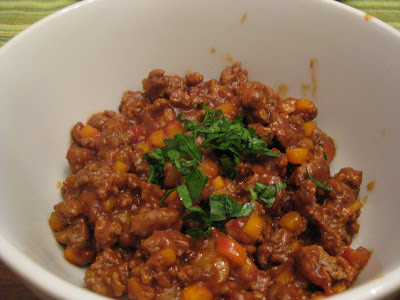
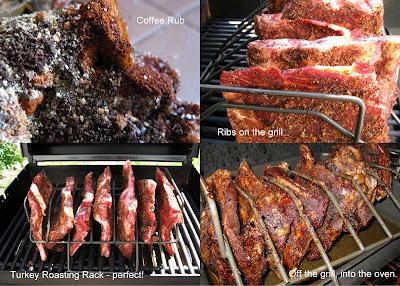
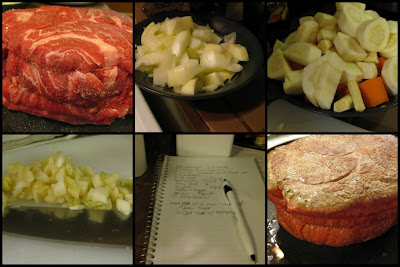
In the spirit of holiday creativity, I made up my own pot roast recipe. I checked an old Cooking Light slow-cooked pot roast recipe for cooking tips and then opened the fridge to pull out the ingredients. For the roasting liquid, I had a bottle of unused Castle Rock Pinot Noir (no red drinkers at my Thanksgiving feast). We had enough for dinner, and two lunches each (6-8 servings, depending on how hungry you are).

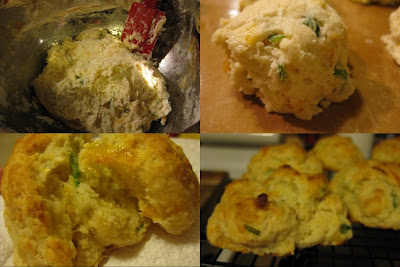
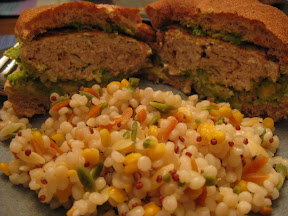
For the side dishes, I cooked up three options. First, cheddar-scallion biscuits. Second, traditional potato and onion latkes. Third, sweet potato and scallion latkes. All delicious, and all great with the pot roast! I'll write up the latkes tomorrow. For this post I'll focus on the pot roast and biscuits.

The biscuits were inspired by a post at Playing House but made following a recipe from TracyFood. The biscuits were unbelievable. Buttery, flaky, cheesy, scallion-y, mmm.... The only change I would make next time is to add a little less salt. For my biscuits I used a cheddar-jack cheese mix. Visit TracyFood for the full recipe! Now on the meat...

Snowy Weekend Pot Roast
1 3-ish lb. beef chuck boneless eye round, tied together
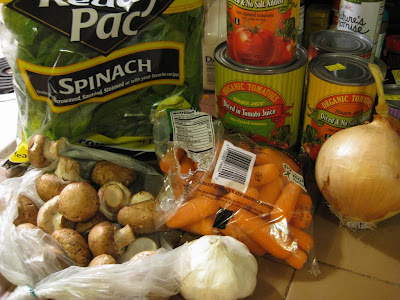
2 medium yellow onions, chopped
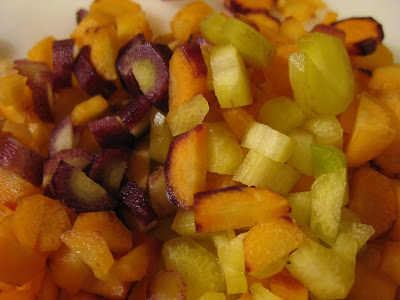
1 lb. parsnips, peeled and cut into 1 inch pieces
1 lb. carrots, peeled and cut into 1 inch pieces
2-3 russet potatoes, peeled and cut into 1 inch pieces
1 cup Pinot Noir (or other red wine)
1 cup reduced sodium beef broth
2 bay Turkish leafs
Kosher salt and pepper (I forgot to measure)
3 cloves of garlic, chopped
1 tablespoon olive oil
1-1.5 teaspoons dried thyme
1 teaspoon sage


Set up your slow-cooker
Heat the oil over medium-high heat in a medium sauce pan (big enough to pour in your liquid and veggies)
Rub salt and pepper on all sides of the roast
Sear meat in pan, approximately 2 minutes per side
Remove meat from the pan and put into the slow cooker
Add a little more oil to the pan, and then add in onions
Cook for about 8 minutes, until they are just beginning to brown
Add in garlic and cook for 1 minute
Pour in wine and beef broth, scraping up any bits on the bottom of the pan
Stir in sage and thyme
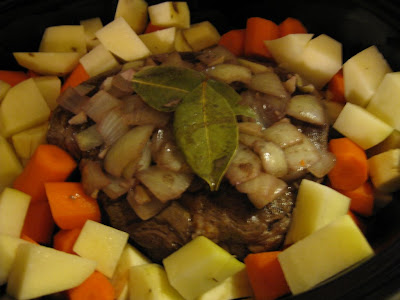
Carefully pour the liquid over the roast in the slow cooker
Put the carrots, parsnips and potatoes around the meat
Put in the two bay leafs and sprinkle with a little more salt and pepper
Cover and cook on high for 2 hours
Reduce heat to low and cook for an additional 3-4 hours, until tender


The biscuits on the side were fabulous! I'll let you check out TracyFood for the recipe, but will share my mouth-watering photos below.


Tuesday, November 17, 2009

Hearty Vegetable Tomato Sauce and Meatballs

We were at a housewarming party recently and were talking with some friends about easy weeknight dinners and recipes that we make a lot. They had some great ideas - Greek inspired tacos, avocado boats - but one idea had me thinking about it the whole way home. Good old spaghetti and meatballs. It is such a comfort food. With our recent trend toward recipes good for leftovers, this definitely filled the bill. And since the slowcooker is still on the counter, I decided to to put it to work again.

Instead of a boring tomato, garlic, and basil sauce, I wanted to make something that packed a nice veggie punch. A trip to the store yielded some nice nutritionally rich ingredients.


Before throwing everything into the pot, the ingredients got a little pre-cooking. First in the saute pan - diced baby bella mushrooms. Next the onions and carrots. Finally, minced garlic and spinach.


After the veggies were sweated and softened it was time to go in the slowcooker. I used a few cans of diced tomatoes with no salt added. I'm not a fan of the off-season tomatoes at the grocery store, the canned tomatoes are a tastier option. The sauce got off to a simmer and then it was time to get to work on the meatballs.

My grandmother makes a mean meatball - so I stick with her method when making mine. They get thrown into the sauce and soak up the flavors of the sauce.

Hearty Veggie Tomato Sauce and Meatballs
Sauce:
1 bag of spinach leaves
1 medium yellow onion, diced
About 1 cup carrots, diced
1-2 cups mushrooms, chopped
3 cloves garlic, minced
2 cans diced tomatoes (no salt added) - Drained
2 cans diced tomatoes (no salt added) - Not drained
1-2 tablespoons tomato paste
Handful of fresh basil leaves
Salt and Pepper

Turn on the slow cooker to the highest setting (mine is 4 hours - high)
Add tomatoes
Heat a small amount of olive oil in a large saute pan over medium heat
Add chopped mushrooms and cook for 3-4 minutes, then add to slowcooker
Add more oil if necessary, and then saute onions and carrots for about 5 minutes, then add to slowcooker
Cook the minced garlic for a minute, then add spinach to the pan, cooking until just wilted
Add spinach to the slowcooker
Cover with lid and let simmer

Meatballs
1 pound ground sirloin
About a cup of Italian seasoned breadcrumbs
1 egg, lightly beaten
Salt and Pepper

Mix all ingredients by hand until just combined - do not over mix
Form into 1 inch balls
Add to sauce
When last meatball has been added to the sauce, cook for 1.5 - 2 hours until cooked through

I left the sauce chunky - but if you wanted a smoother consistency you could use an immersion blender to blend it. For the first night, we had the sauce and meatballs the traditional way - over whole wheat spaghetti noodles. On the side - whole wheat garlic bread.

For the second night, I planned to make meatball subs with the rest of the whole wheat bread. What I didn't realize is that the hubby had packed all the remaining meatballs for my lunch that day. So we had delicious veggie sauce subs with melted provolone cheese. Still hearty and tasty - just missing a little protein.


Anyway you want to serve it - this is a great way to add some veggies to your diet and have a great comforting meal!

Stay tuned for some more fall favorites like beef stew and roasted root vegetables. Leave a note about your favorite hearty dish or favorite comfort food!

Sunday, November 1, 2009

Slow Cooked Goodness

When we got married (four years ago already!), I (we) registered for all the fun kitchen gadgets and appliances that are absolutely necessary for cooking. I use a lot of dishes, plates, and utensils in the kitchen but don't always use the fancy electrics that we own. No more! I've pulled out the slow-cooker and decided to put it to work.

My first thought about using the slow-cooker was that most recipes call for 6-8 hour cooking times. I'm often gone for 10-12 hours during the day, so this doesn't really work out very well. Then it dawned on me - I could cook while we sleep. I can prep the food after dinner and homework and then turn on the slow-cooker overnight. So I searched Epicurious for a slow-cooker brisket recipe and got to work!

This recipe is definitely a keeper. There were a few things I didn't think about before cooking. 1 - All night we dreamed of brisket. The smell of roasting onions permeated the house. 2 - The slow cooker lid doesn't seal perfectly and we woke up to a stream of brisket sauce down the counter. Besides that - it was great!

Here's the ingredient list for the sauce (my first time using the iPhone in the kitchen - a little messy). You can find the full recipe at the Epicurious website:

The recipe did involve a little prep work - not strictly a dump and cook recipe. First is browning the onions. Second is searing the brisket to get a nice brown crust. Then, cut potatoes into 1/4 inch slices and line the bottom of the slow-cooker. Next time I will halve the number of potatoes as they took up too much room. Then I followed the recipe and put the slow cooker to work while we slept. The brisket was fall apart tender, the potatoes had a great meaty flavor, and the veggies cooked down into a tasty sauce. For two of us we had enough for a few days of lunches and dinners. Stay tuned for more slow-cooker treats!

Thursday, September 24, 2009

Burgers, Corn, Radishes and a nice Rose

I'm a little behind on my blog posts - this one goes back to last Tuesday night. With adjusting to evening classes and homework, it's been hard to keep up! Sorry for the delay, I hope that you enjoy reading the next few posts from the past two weeks.

I had been to the Tuesday farmers market and continuing the theme of buying something new to me each time, I picked up some watermelon radishes from Siena Farm. On the train ride home, I noticed that someone had left a bag on the baggage rack. I could read the name Kimball Farm on the bag and figured that someone forgot to take it home (I get off at the last stop). I picked up the bag and inside were 4 fresh ears of corn! I'm sorry to the commuter who had no side dish for dinner, but thank you for adding to ours!

I decided on making a burgers for a late summer (well, early fall) dinner and grilled the corn along with them. I had recently read about a radish salad at one of my new favorite websites, http://www.localinseason.com/ and followed their recipe for the dressing.

I paired it with some wine I picked up at one of my other favorite new places, http://www.binendswine.com/. It's a great rose from Oregon - A-Z wines. Perfect for pre-, during, and post-meal sipping!

Every time we have burgers I like to add a little twist. The hubby had gone to the store this week and bought whatever veggies looked good. We had red peppers and onions on hand. I mixed up a variation of my meatloaf mixture for the burgers and tossed in a little hoisin sauce for a little Asian flavor. I grilled extra red peppers for a topping and made sure to toast the whole wheat buns on the grill too. This was delicious! Enjoy!

Asian Flavored Meatloaf Burgers (that's quite a mouthful!)
1 lb. ground sirloin
1/4 red pepper, diced very small
A few slices of onion, diced very small
About 1 tablespoon (2-3 dashes) Worcestershire sauce
About 1 tablespoon hoisin sauce
1 egg, lightly beaten
Breadcrumbs, just enough to hold the burgers together

Preheat the grill before you make the burgers
Score the meat into four equal portions
Form patties, but don't over work
Set aside until ready to grill
Grill until desired doneness
Top with lettuce, grilled red peppers, and a little extra hoisin sauce

Simple and Delicious Radish Salad
Check out the recipe and nice presentation at http://www.localinseason.com/early-fall/37-radish-and-cucumber-salad.html. I didn't have any cucumbers on hands, so I stuck to just radishes.

Thursday, August 20, 2009

Spice up a Monday Night Dinner

A quick note before this post. Thanks for reading! I'm excited to find out that so many new and old friends stop by to check out what's cooking. I hope that you'll take a minute to say hi in the comments and let me know what you think - or just say hello! It's fun to see all the readers and find out where they are from! Thanks! Now on to the fun....

Cooking almost every night is a challenge - coming up with interesting meals and making sure to vary the ingredients. Often I find myself going back to the same meals and repeating them a little too frequently. The trick is to vary some piece of the meal to keep it interesting.

One of these meals for us is meatloaf muffins. The recipe lends itself a lot of variations - different veggies, sauces, even types of ground meat. For this occasion I kept it pretty simple, but decided to dress them up as 'cupcakes'. The perfect way to spice up a Monday night!

For the 'cake', I used the meatloaf muffin recipe that I previously posted. I cut out foil squares to line my muffin tin (no foil muffin cups on hand). I sprayed them well with some olive oil cooking spray before filling them with the meatloaf mixture. I topped the meat with a good layer of ketchup before cooking.

For the icing, I made some basic mashed potatoes and put them into a large ziploc bag with the bottom corner cut off (a make-shift pastry bag). I piped the potatoes on top and 'sprinkled' them with some dried basil.

For a real party, serve with green bean 'candles'! I have to admit, I feel silly even posting that sentence. Here's the photo anyway!


Wednesday, July 8, 2009

Smoked Meats - Next Edition

With the success of smoking the beef ribs, I decided that it was time to try out some other meats. I picked up some beef short ribs and brisket at the store and headed home to fire up the grill.


The grill set up was the same, except the meat went directly on the grill grates this time. I consulted an assortment of grilling websites to get an estimate on how long to cook, if a mop sauce needed, and other tips for tender meat. When I cooked the ribs the first time, I split the cooking between the grill and the oven. For these short ribs, I only used the grill. I did finish off the brisket in the oven with some onions. The cook time is 4 hours plus, so I got everything set up and then mowed the lawn (keeping an eye on the grill). I had more time to spare, so I made egg salad for the week's lunch and chopped up all the veggies we had to save time during the week.

For the meats, I used the same coffee rub that I had leftover. I put on the rub and refrigerated the meat for about an hour before cooking. You could leave it overnight for even more flavor. Here's a summary of the two different meals.

Smoked Beef Short Ribs
Almost every grocery store carries beef short ribs now. They are often on sale and make a nice hearty meal. They come about 4-5 per pack - perfect for two people. These went down directly on the grill rack (not over the heat). They cooked for about 3 hours, flipping about halfway, until the meat shrinks up from the bone.


I did use a Mop Sauce to keep the meat moist, basting after about 2 hours, and then once every 45 minutes or so. It was an easy recipe - I can't remember which website I pulled it from:

Mop Sauce
1 cup beer (I used Newcastle)
1 cup apple cider (didn't have any - so I used apple juice)
1/2 cup apple cider vinegar
1/2 cup coffee
1/4 cup vegetable oil
1/4 cup Worcestershire sauce

I served the short ribs with couscous and was too lazy to make a vegetable. I did use fruit in the dessert (I'll post that at the end).

Smoked Brisket
I love brisket - it is one of my favorite things to cook. Most of my recipes involve searing the meat and then putting it in the oven for 2-3 hours until its done. What could be easier? Smoking on the grill was just as easy. After about 2 hours I basted with the mop sauce and flipped it over. I basted every 45 minutes or so for another 2ish hours. To finish it off, I put it in the oven in a covered roasting pan filled with one bottle of Newcastle beer (to keep some moisture in there). I added some sweet vidalia onions and let it cook for another our. Since we weren't planning to have it that night, I let it cool and then put it in the fridge.

Quick note - the cook time is about 1 hour per pound of brisket. We had a 4 pound brisket.

For the onions:
Cut one vidalia onion into 1/4 inch rings
Brown in butter or olive oil in a medium skillet
Add browned onions to the brisket in the oven and let cook with the meat


On the day we wanted to eat it, I put it back in the oven for 2 hours so it would get even more tender. We sliced it and served it with some canned green beans (I had a craving for them) and some good old canned baked beans. It was a definite comfort meal. My mouth is watering just thinking about it!

Dessert!
This was one of those meals that called for dessert. I had some cherry pie filling and canned pineapple in the pantry and decided to make a semi-upside down cake. It was delicious - I had a hard time not eating the entire cake!

Cherry Pineapple Semi-Upside Down Cake
1 can cherry pie filling (the kind with no whole cherries in it)
1/4 of a can of pineapple chunks, drained
Batter prepared from Jiffy baking mix recipe for fruit cobbler

Preheat oven to 400 degrees
Dump the cherry pie filling and pineapple into the bottom of a greased 2 qt. casserole dish
Pour batter evenly over the top
Bake for 15 minutes at 400 degrees
Reduce the heat to 350 degrees and cook for another 10 minutes

You can either flip the cake over onto a plate, or just cut slices and scoop it out. I'm off to the kitchen to get a piece right now!!


Sunday, July 5, 2009

Old Favorite - Sloppy Joe Sandwiches

A few years ago I figured out that it was cheaper - and tastier - to make my own sloppy joe sauce. Don't get me wrong, Manwich is tasty, but it is salty! And once you read the label, you realize that you have most of the ingredients in your pantry and it takes no time at all to make a homemade sauce.

I downloaded a new iPhone app from Whole Foods that lets you put in a few ingredients you have on hand and it will suggest recipes for you. This is an entertaining app to play with on the train ride home from work. I've gotten good at coming up with impossible combinations for the WF recipe gurus (soy milk + peas + beef stumps them). One of the featured recipes last week was for sloppy joe sandwiches so I decided to give their recipe a try. I had ground beef in the fridge and all the other ingredients in the pantry. I didn't have any onions, so I decided to use up the last of the rainbow carrots from the farmer's market. Don't they look good?


On the side I decided to make a 'quick' baked beans. I figured that the carrots counted for our vegetable, so I didn't make another one on the side. I served the sandwiches on potato rolls for a delicious meal! Here's the recipe and the photo for 2 servings. You should start the beans first and then move on to the sloppy joes.

Quick Sloppy Joe Sandwiches
Adapted from a Whole Foods Recipe

1/2 pound ground sirloin
About 1/2 cup carrots, diced into small pieces
Kosher salt, to taste
Ground pepper, to taste
1/3 cup tomato ketchup
2 teaspoons apple cider vinegar
2 teaspoons Worcestershire sauce
2 teaspoons brown sugar (I used dark brown sugar)
2 teaspoons prepared yellow mustard
2 burger buns

Heat a medium sized skillet to medium heat
Put the beef in the pan and brown for about 5—7 minutes
Add the carrots and season with salt and pepper
Cook until carrots are almost soft about 5 minutes
Add in ketchup, vinegar, Worcestershire sauce, sugar and mustard and stir well
Simmer until slightly thickened, about 10 minutes
Spoon over burgers

These would be tasty with some sharp cheddar cheese or a nice colby jack.

Quick Baked Beans


1 can kidney beans, drained
1 garlic scape chopped into bean size pieces (or 1 garlic clove minced)
1 teaspoon bbq rub (or your favorite spices)
1 tablespoon water

Heat a small pot (with a lid) over medium heat
Add garlic and cook for 2-3 minutes
Add beans, water, and seasoning to the pot
Simmer over medium heat for about 15 minutes (or until you're done making the rest of the meal)

Summary (for both dishes):
Prep Time: 10-15 minutes
Cook Time: 25-30 minutes
Skillet, cutting board and knife, small pot with lid, measuring spoons and cups, spoons, serving dishes

Wednesday, June 17, 2009

Backyard BBQ Part 2 - Smoked Ribs

**Special note - Good Cook Doris is moving! Update your bookmarks and favorites to http://www.goodcookdoris.com/. If you go to http://goodcookdoris.blogspot.com/ you will be redirected to the new address. Thanks for reading!

First up in the Backyard BBQ series is smoked ribs. My brother in Indy has a smoker and is always turning out things like brisket, pulled pork, ribs, and more. I decided that just because I don't own a smoker doesn't mean I can't do it too! After consulting numerous cookbooks and barbecue expert websites, I was all set for a great rack of ribs.

According to the BBQ gurus - the preferred equipment is obviously a dedicated smoker. Next on the list is a charcoal grill, and last on the list is a gas grill (that's what we own). The basic premise for smoking meat is to cook over indirect heat. In order to set up the grill, a few new accessories were needed. I bought some hickory wood chips, a small cast iron smoker box, and some shallow disposable aluminum pans. Instead of buying a fancy rib rack to cook the ribs in, I used the roasting rack from my turkey pan. Turning it upside down worked perfectly.

Next, for the type of ribs. There are many different kinds out there. The most popular summer ribs are typically pork ribs, something we don't cook at home. We set out to find beef ribs and were pleasantly surprised to find them on sale at the regular grocery store. We used 3.5 racks, each with 4-5 ribs per rack. They were split into half racks (there are 7 half-racks in the photo above). Note - these are not short ribs.

There are quite a few different opinions on the way to prepare ribs for cooking. Some profess that the only way to go is with sauce, some swear by a combination of a rub and a mop sauce. I decided to stick with a dry rub and let everyone decide if they wanted to add sauce.

On one of my frequent trips to Whole Foods, I picked up a summer recipe booklet along with my usual free samples. There was a recipe for "Chef Lou Lambert's Famous Coffee Dry Rub". It's written up as a rub for smoked brisket, but sounded so good that I had to try it. A few notes - this made more than enough for the ribs we made. We have plenty of rub leftover to add to other dishes. I added it to some burgers tonight and they turned out great.

Without further delay - the rub recipe and cooking instructions:

Coffee Dry Rub (courtesy of Whole Foods Fire Up the Grill flyer)
2 cups light brown sugar (I used dark brown, it's all we had)
1 cup chili powder
1/4 cup paprika
1/4 cup kosher salt
1/2 cup medium ground black pepper
1/4 cup finely ground dark roast coffee

Dump all ingredients in a medium bowl
Stir to combine well
Rub over all surfaces of the ribs and place ribs in a large disposable aluminum pan
Refrigerate for up to 24 hours (I only put them in the fridge for about an hour)

Cooking Instructions
Soak a few handfuls of wood chips in water for 15 minutes or more
Open up the grill and remove the grill grate
Place the smoker box over the burner you plan to turn on for cooking
Place two shallow aluminum trays over the burner(s) that you do not plan to turn on and fill them with water
Replace the grill grate on the top
Light the grill and turn all the burners to high
Close the lid and wait for about 10-15 minutes or until a lot of smoke is visible from the grill
Turn off all the burners except the one under the wood chips - turning that to medium (about 275-300 degrees)
Open the grill and place the roasting rack on the grate over the pans of water
Place the ribs into the rack
Close the lid and let cook for 2 hours, checking occasionally to make sure nothing is on fire

Preheat the oven to 250 degrees
Turn off the burners on the grill and remove the ribs (still on the roasting rack) and place into the roasting pan
Add just enough water to cover the bottom of the pan
Cover tightly with aluminum foil and cook for about 1.5 - 2 hours or until tender
Transfer to a serving platter, tent with foil, and let rest for 10 minutes before cutting and serving.

I served them with homemade barbecue sauce, recipe previously posted. I used maple syrup (not honey) and threw in a roasted jalapeno for some heat. The ribs were really tasty as is, so hardly any sauce was used.

Sadly, we didn't have any leftovers of this for the next day. Guess I'll have to fire up the grill again soon!

Monday, June 15, 2009

Here's a Preview - more to come

I'm still recovering from the whirlwind weekend in St. Louis. Here's a photo of the smoked ribs - recipe and story to follow!

I hope that you are enjoying the blog and are creating fun meals in your kitchen too! If you have a minute, leave a comment and say hello. It's fun to see where all the readers are from and hear what you think!

Sunday, May 31, 2009

Burgers - Two Ways

Our electric bill typically goes down by $20/month in the summer because we are out back grilling instead of baking. Here are two different delicious burger recipes to help you save some money this summer (or really, year round). First up, a twist on the turkey burger. Second, a twist on a cheeseburger.

First up is a Southwest inspired turkey burger served with guacamole and a coucous, quinoa, and orzo blend. As I've mentioned before, we're trying to add more variety into our diet and this is a great addition. One thing to note about the healthiest choice when you are choosing ground turkey: when you go to the store, the healthier choice is ground turkey breast, not just ground turkey. Ground turkey contains both white and dark meat and is not as low cal/low fat as the ground turkey breast.

A few recipe tips: The onions in the burgers help to keep them moist. I tried out a new trick I saw Bobby Flay do - after you form the burger patty, press down in the middle to give it a little indent. When the burgers cook, they usually puff up in the middle. By starting with the indent they will end up flat - not like a baseball. I'm happy to report that this worked. Check out the photo! Now on to the recipe:


Southwest Inspired Turkey Burger
1 lb. ground turkey breast
1/4 of a vidalia onion (helps keep burgers moist)
Handful of fresh cilantro, chopped
1/2 teaspoon ground cumin
1 teaspoon ground chili powder
A few shakes of green (jalapeno) Tabasco sauce
Salt and Pepper

Fire up the grill to medium-high heat
In a large bowl, mix all the ingredients together by hand
Split the mixture into four equal portions
Form four burger patties, pressing down in the middle to give them a little dent
Grill for a few minutes on each side

I toasted our whole wheat hamburger buns on the grill before serving
Top with guacamole and burgers and enjoy!

Summary:
Prep time: 5-10 minutes
Cook time: 10 minutes
Cutting board and knife, bowl, plates, grill spatula, grill, and serving dishes

Makes 4 quarter-pound patties


Next up, a Non-Traditional Cheeseburger and Fries


Using another idea from one of the endless food shows I watch on TV, I decided to make a cheeseburger with the cheese inside the burger. We had some leftover mozzarella from the caprese sandwiches that I had for lunch during the week. Using my regular burger recipe, I added the cheese and voila! - a gourmet dinner at home. On the side, I made a delicious batch of no-fry fries. The recipe comes from an issue of a Better Homes and Gardens, "Simply Perfect Dinners" that I've had for a while (I just checked the magazine and the date is Spring 2000). There are 4-5 recipes in there that I always go back to - a great investment for $5.99! Here's the recipe.

Start the fries first, since they take longer than the burgers.


No-Fry Fries (adapted from Better Homes and Gardens)
Non-stick cooking spray
2 large baking potatoes (1 lb. total)
1/4 cup grated Parmesan cheese
1/2 teaspoon paprika
1/8 teaspoon ground black pepper

Preheat the oven to 425 degrees
Lightly coat a large baking sheet with cooking spray
Cut potatoes lengthwise into thin wedges (I cut these in half again to make shorter fries)
Place the wedges into a ziplock bag and spray them with the non-stick cooking spray
In a small bowl, mix the cheese, paprika, and pepper
Pour the mixture into the ziplock bag, close bag, and toss until potatoes are well-coated
Pour out potatoes onto the baking sheet and arrange them in a single layer
Bake for 15 minutes and then turn the fries over
Bake for another 15 minutes until crisp and fork-tender

Summary:
Prep time: 5 minutes
Cook time: 30 minutes
Cutting board and knife, ziplock bag, baking sheet, spatula

Nutrition info per serving: 155 calories, 3g total fat, 4mg cholesterol, 103mg sodium, 29g carbohydrates, 3g dietary fiber, 5g protein


Inside-out Sirloin Cheeseburgers
1/2 lb. ground sirloin
About 1 tablespoon diced vidalia onions
1 teaspoon Worcestershire sauce
1 teaspoon Montreal grill seasoning
2 1-inch squares of mozzarella cheese

Fire up the grill to medium-high
In a bowl, mix the sirloin, onions, Worcestershire, and grill seasoning by hand
Split into two even portions
Take one portion and split into to even pieces
Form each of the two pieces into a patty
Take one patty in your hand, place the mozzarella square in the middle, and top with the second patty
Crimp the edges to seal around the cheese
Repeat with the second portion of meat
You will have 2 quarter-pound burgers to grill
Grill for a few minutes on each side until desired doneness

We served ours with ketchup and mustard, lettuce, and tomato.

Summary:
Prep time: 5 minutes
Cook time: 10-15 minutes
Cutting board and knife, bowl, grill, and grilling utensils


Monday, May 4, 2009

Keeping it Simple - Taco Night

This is a favorite meal at our house. Whenever we can't think of something to eat we decide on tacos. Very customizable and always delicious. Skip those sodium packed taco seasoning packets and make your own. It's quick and a much better value. I've stopped measuring - but I'll do my best to give you an accurate recipe below.

My biggest pet peeve about making tacos is that they don't sell hard taco shells in packs of less than 10. With two of us, that's 5 servings of tacos! That's why this gets categorized in the 'good for leftovers section'. Make 1.5 lbs of beef and you're set for a few lunches and dinners. Or invite a few friends over for game night and eat it all!

Along with the meat, toppings include:
Fresh shredded sharp cheddar cheese (you could also buy the pre-shredded)
Shredded lettuce
Chopped black olives
Salsa (store-bought)
Fresh guacamole (see the last post)


Good side dish options:
Black Beans
Refried beans
Yellow rice

Taco Seasoning - without the excess sodium
2 tbsp. chili powder
1 tbsp. ground cumin
1 tsp. dried cilantro
1 tsp. garlic powder
A few shakes of salt
A few grinds of black pepper
About 2 tbsp. tomato paste (2 good squeezes from the tube)


Brown 1-1.5 lbs. ground sirloin over medium-high heat
Drain excess fat and return to the skillet on medium heat
Add 1/4 cup of water and all of the seasonings
Mix well and cook until the water is absorbed


You could also substitute ground turkey or chicken for a different twist.

Sunday, May 3, 2009

Mmm...muffins...meatloaf muffins


About three or four years ago I watched a 30 Minute Meals episode where Rachael Ray made meatloaf muffins. Growing up, we never had meatloaf. When I moved out on my own, I never thought about it as an option. Since I found this recipe I've been making this regularly! The technique lends itself to a lot of creative ingredient combinations. Stick with the basic meat, egg, and breadcrumbs and then its all up to your mood and your ingredients. Sometimes smoky and BBQ flavored, sometimes salsa and southwestern. This was a pretty traditional interpretation. We had leftover jicama salad as our side dish. Great combination of hot and cold, crunchy and smooth!

For the original recipe, click here. My version:

Meatloaf Muffins - This week's version

1 pound ground sirloin (or lean ground beef)
1 yellow onion, cut into quarters
1 orange or red pepper, seeds removed and cut into chunks
1 jalapeno, seeded and cut into chunks
1 egg, lightly beaten
1/2 cup of ketchup + extra for topping
1/2 cup of smoky barbecue sauce
1-2 tablespoons of Montreal Steak Seasoning
1/2 cup of bread crumbs
Oil to grease the muffin tins


Preheat the oven to 450 degrees.
Place the ground beef in a large bowl
Place the onion, pepper, and jalapeno into a food processor
Pulse until finely chopped and then add to the bowl with the meat
Add egg, ketchup, BBQ sauce and seasoning to the bowl and mix
Add bread crumbs and mix until well combined (but don't over mix)
Brush muffin tins with either vegetable oil or extra virgin olive oil
I use a 1/4 cup dry measuring cup to scoop the meatloaf mixture into the tins and pat them down
Top each muffin with BBQ sauce (I didn't have any extra sauce, so I used ketchup on top)
Bake for about 20 minutes or until cooked through
Use a spoon to remove from the pan


Makes about 8-10 muffins.

Summary:
Prep time: 10 minutes
Cook time: 20-25 minutes
Food processor, cutting board and knife, muffin tin, 1/4 cup dry measuring cup, spoon

Fresh Flavors....Jicama!

Some nights you just really don't feel like making a labor-intensive dinner. We had grilled some sirloin tips along with the mushrooms from the other night and were planning to take the steak for lunch. Instead, we heated them up and served them with homemade guacamole and a jicama salad. It's easy to get into a vegetable rut - asparagus, green beans, peas - and just keep repeating. One of my goals is to use more variety in our meals. This is a simple as checking out the new arrivals in the produce section and choosing seasonal veggies.

Since the steak was already cooked, it just needed a quick warm up. Guacamole is our favorite condiment and can be done in less than 3 minutes. The jicama salad is also very easy and quick. You just need a sharp knife and your ingredients! I used an assortment of veggies that we had in the fridge to create the salad. You could add and subtract ingredients according to your taste. It tasted great the next day too!


Jicama Salad with Citrus Dressing
1 jicama root, peeled
1/2 of a seedless cucumber (English cucumber)
1/4 of a red onion, sliced into 1/4 inch slices
1 orange (any variety)
Juice of 1 lime
Juice of 1 lemon
1-2 teaspoons of cilantro
Dash of salt

Peel jicama root, removing the outer skin
Using a sharp knife, cut the jicama into 1/4 inch sticks and place in serving bowl
Cut cucumber into 1/4 inch sticks and place into bowl
Slice onion and add to bowl
Cut the orange in half, then cut each half into 2 pieces
Using a knife, cut the peel way from the flesh making sure to cut off all the white pith
Cut into small wedges and add to bowl
In a measuring cup or small bowl, combine the lemon and lime juice and cilantro
Pour over the salad and toss well
Refrigerate for about 20 minutes before serving

Makes about 6 servings as a side dish.

Summary:
Prep time: 10 minutes
Cook time: None!
Sharp knife, cutting board, measuring cup or small bowl, serving dish, serving utensils


Lara's Guacamole
1 avocado
About 2-3 tablespoons of diced red onion
Diced fresh jalapeno (seeded) - amount varies based on personal taste
Juice from half a lime
Salt
Pepper
Cilantro

Using sharp knife, cut avocado in half and remove the pit
Score the avocado into cubes on the inside (it will come out in cubes)
Scoop out the avocado into a serving bowl and mash until desired consistency
Add onion, jalapeno, lime juice and seasoning
Stir and serve immediately

Serves 2.

Summary:
Prep time: 2-3 minutes
Cook time: None!
Knife, spoon, fork or masher, and bowl

Tuesday, April 21, 2009

Monday Night Chili Dinner


Chili is one of the dishes that you can customize based on what you have on hand or who you are serving. I used ground beef, but you could easily use ground turkey, ground tofu, or just extra veggies. The method is the same for whatever ingredients you decide to throw in. This version had kidney beans, black beans, garlic, jalapeno, orange pepper, and red onions. For seasoning I used some salt, pepper, cilantro, chili powder, cumin, and a little green Tabasco sauce.

The basic cooking method is to heat oil in a soup pot and then sweat the veggies until they are soft. Then toss in the drained beans, canned tomatoes, and ground meat if you are using it. Bring it to a boil and then turn down to a simmer. Stir in the spices and then just keep warm until you are ready to eat. Easy and tasty!

On the side, I made a quick cornbread according to the recipe on the cornmeal container. It was pretty bland for my taste - it needed some extra salt. I put some honey on and sprinkled it with salt and it tasted fine.

The whole meal takes about 30 minutes - you can cook the chili while the cornbread is in the oven.

Monday, April 20, 2009

Passover Eats - Part 5: Dinner!

The last few nights of Passover got busy with meetings and other things that kept me from the blog. Here are a few more posts about our Passover meals. In honor of the BU Hockey Team going to the national championship game, we had a festive meal on Saturday night. It was colorful and delicious! On the menu: brisket, turkey breast, golden beets and asparagus, and a medley of colorful roasted potatoes. Perfect for leftovers! The brisket and beets were covered in the earlier Passover Posts. The turkey is a pretty easy recipe - just make sure to cook it long enough! I don't have exact measurements - it all depends on the size of the turkey.

Lara's Roasted Turkey Breast
Fresh turkey breast
1 orange, zested and sliced
2-3 tbsp. of butter
Salt
Pepper
A few dashes of poultry seasoning
A splash or two of orange juice

Preheat oven to 350 degrees
Sprinkle some olive oil on the bottom of a roasting pan
Arrange orange slices on the bottom of the pan
Rinse and pat the turkey breast dry
Place the turkey, skin side up on top of the oranges
Make a few slits in the turkey skin
Pour orange juice over the top
Rub butter and orange zest all over the top of the turkey, making sure to get it into the slits under the skin
Sprinkle with salt, pepper, and poultry seasoning
Bake for approximately 2 hours (until internal temperature is 170 degrees or indicator pops up)
If the turkey looks like its getting too brown, put a piece of foil over the top

Let rest for 15-20 minutes before slicing.

Summary:
Prep Time: 10 minutes
Cook Time: Approximately 2 hours
Roasting pan, cutting board, knife, zester, measuring cups

Monday, April 13, 2009

Passover Eats - Part 1: Brisket

The next few posts will cover the various foods we've had this week for Passover. If they are not new recipes, I'll list what we substituted or omitted to make the recipe Passover friendly. My non-Passover keeping friends always say that this should be a great week for weight-loss (no carbs!), but they have no idea how deadly all the Passover treats can be (K for P Dr. Brown's cream soda, macaroons, chocolate caramel matzoh, crumb cake......). Hope you enjoy this collection of food! First up - brisket!

The last brisket recipe I made had beer - a definite no for Passover. So I substituted in Manischewitz Concord Grape wine, a Passover favorite. I stuck to the basic recipe proportions and techniques in Joy of Cooking to make this delicious meal.

Passover Brisket
5 lb. brisket
2-3 cloves garlic, minced
2 large onions, sliced into 1/4 rings
1/2 cup beef broth
1/2 cup concord grape wine (Manischewitz or Mogen David)
1/2 cup organic (K for P) smoky barbecue sauce (or k for p chili sauce)
Salt and Pepper
Olive oil

Preheat oven to 350 degrees
Trim excess fat from the brisket
Rub the minced garlic, salt and pepper all over the brisket (use your hands for the garlic)
Cut the onions and measure out everything you need for the recipe
Heat a few tablespoons of olive oil in a large heavy pot (with a lid) over medium heat
Put in brisket and sear for 4 minutes on one side
Flip over brisket and add onions to the pot, sear for 4 more minutes
Remove brisket from the pot and put it aside on a plate
Continue to cook the onions until they are browned, about 5 minutes
Add beef broth to the pot and scrape the browned bits off the bottom
Add brisket back to pot and add BBQ sauce and wine
Put the lid on the pot and place in the 350 degree oven
Cook for 2.5 hours
Cool in the pot and refrigerate overnight

When you are ready to serve, slice and return to the pot with the sauce
Cook at 350 degrees for 30 minutes

Summary:
Prep Time: 10 minutes
Cook Time: Active - 15 minutes; Total 2-3 hours
Large heavy pot with lid, cutting board and knives, measuring cups, slicing knife and serving utensils

Monday, April 6, 2009

Soy Ginger Flank Steak with Lime-Cilantro Rice

Flank steak was on sale at the store and it makes for a very quick and easy dinner. We paired it with a 90-second rice mix (from Trader Joe's) and some fresh peas. Josh picked up the peas at the store, they were so much better than the frozen peas.

The glaze for the steak was soy sauce, rice wine vinegar, ground ginger, garlic, salt and pepper. The whole meal was topped with toasted sesame seeds. I cooked the steak on our indoor grill pan. It is a cast iron pan - smooth on one side and grill lines on the other. It fits across two burners on the stove. Quick and easy to clean - Josh's favorite feature.

Sunday, March 22, 2009

Rice Noodles with Sesame-Ginger Flank Steak

New night, new cuisine! Some of our favorite meals out are Thai, Vietnamese, and Japanese cuisine. With another night of hockey on Saturday, we decided to dine in and make our own version. This was budget-friendly and not too unhealthy.

I used to subscribe to Cooking Light and have a lot of recipes that I saved, but never got around to making. Flipping through my binder of recipes, I came across this one for Rice Noodles with Sesame-Ginger Flank Steak. The flavors were delicious - fresh ginger, garlic, soy sauce, and toasted sesame seeds. We had a lot of the ingredients on hand, just had to pick up some veggies, rice noodles, and a fresh container of sesame seeds. We didn't have and sesame oil on hand, so I substituted with vegetable oil. You could easily substitute tofu for the steak to make it vegetarian.

We bought some salmon fresh rolls from the sushi counter at the grocery store. They came with a delicious peanut dipping sauce. The rolls have rice noodles, cabbage, mint, shredded carrot, and sushi salmon all wrapped in rice paper. You'll find these on the menu at most Thai and Vietnamese restaurants with either tofu or shrimp instead of the salmon.

This is definitely a keeper! It was great the next day for lunch. More photos in the album to the right.

Sunday, March 8, 2009

Spanish Beef and Yellow Rice


I've been cooking a lot - but have been delinquent in getting the pictures and recipes online. Here is one of last week's creations. We eat ground beef a lot and were looking for something other than a burger or meatloaf. A quick check of the fridge (and a look at a few recipes) inspired this Spanish style beef. I served it over yellow rice with a little guacamole on the side. Muy bueno!

This is a pretty easy recipe and can be adjusted for the veggies and ingredients you have in the fridge. I threw in garlic, yellow onions, red pepper, and fresh parsley. The recipes I looked at all called for tomato sauce, which I did not have. I used a can of diced tomatoes and a couple of squirts of tomato paste instead. I think the sauce might have made it too soupy. The yellow rice was lovingly prepared by Goya, I just followed the instructions on the box.

Here's how I did it - more pictures are in the photo album.

Spanish Style Beef (served with rice)
1 tbsp. olive oil
1 - 1/4 lb. Ground sirloin (or ground beef)
1/2 yellow onion, diced
1 red pepper, diced
2-3 cloves garlic, minced
1 can diced tomatoes, no salt added
2-3 tablespoons tomato paste (from a tube)
About 1-2 tsp. each Chili Powder and Cumin (to taste)
Handful of chopped fresh parsley
Salt and pepper

Heat olive oil in a large skillet over medium heat
Add the ground beef and brown for 3-4 minutes, crumbling the beef as it cooks
Add onions, pepper, and garlic and continue to cook until beef is just brown
Drain any excess fat, if necessary
Stir in tomatoes, tomato paste, spices, and parsley
Bring mixture to a boil, reduce heat to low and simmer for about 5 minutes, or until the rice is ready.

I served it over a Goya Yellow rice - a nice rich flavor. You could use any type of rice and it would be delicious.

Leftover meat would be a good filling for stuffed peppers (top with cheese and stick under the broiler), tacos, or burritos. I'm always looking for ways to cook once and use for a few meals! Enjoy!

Summary:
Prep Time - 5 minutes
Cook Time - 10-15 minutes (meat); 25 minutes (rice)
1 large skillet, spoon for stirring, cutting board and knives

Monday, February 23, 2009

Brisket Party!


Leftover brisket - part two! Brisket makes a great hearty dinner for company - especially on a freezing winter night. We had some dinner guests over to enjoy the last of the 5 lb. brisket. Mix in a few side dishes, salad, bread, and dessert for a full meal! Wines were expertly selected by the wine expert at http://vintage78.blogspot.com.

First course:
Baby greens salad with carrots, cucumber, red peppers, and black olives. Served with either a lemon tarragon vinaigrette or balsamic dressing.

Wine pairing: Chardonnay from Spring Lake Estates in the Niagara area (NY)

Main course:
Barbecue Brisket: Cooked brisket heated up in smoky BBQ sauce. Heated at 250 degrees for about 30-45 minutes until nice and tender and falling apart.

Pumpkin Cornbread: Followed the corn muffin mix recipe, adding in about 1/2 cup canned pumpkin and a tbsp. of sugar. Baked according to directions on the box. This was really moist and a very pretty golden color.

Smoky Baked Beans: Delicious! These were so good - we ate every last bit of them (well, there were no leftovers from anything else either....). I used a little help with a recipe I found online: http://www.foodnetwork.com/recipes/food-fantasy/sweet-and-smoky-baked-beans-recipe/index.html. I swapped out a few ingredients - turkey bacon for the bacon and red peppers for the green. For the cooking method, I cooked them on the stove top for the 10-15 minutes, then let them cool and put them in the refrigerator. Before dinner I heated them up in the oven alongside the brisket.

Wine: Pinot Noir from Warm Lakes in the Niagara (NY) area.

Dessert:
Individual cherry cobbler pies. These were easy and fun to make and very tasty! I bought pre-made miniature pie crusts from the grocery store. Brushed them with egg whites and baked for 5 minutes. Then I filled them with canned cherry pie filling. For the top, I made a mixture of flour, oats, brown sugar and butter. Bake for 15-20 minutes and instant dessert!

There were NO leftovers at all. This is definitely a keeper!

LinkWithin

Related Posts with Thumbnails